Saturday 20 April 2013

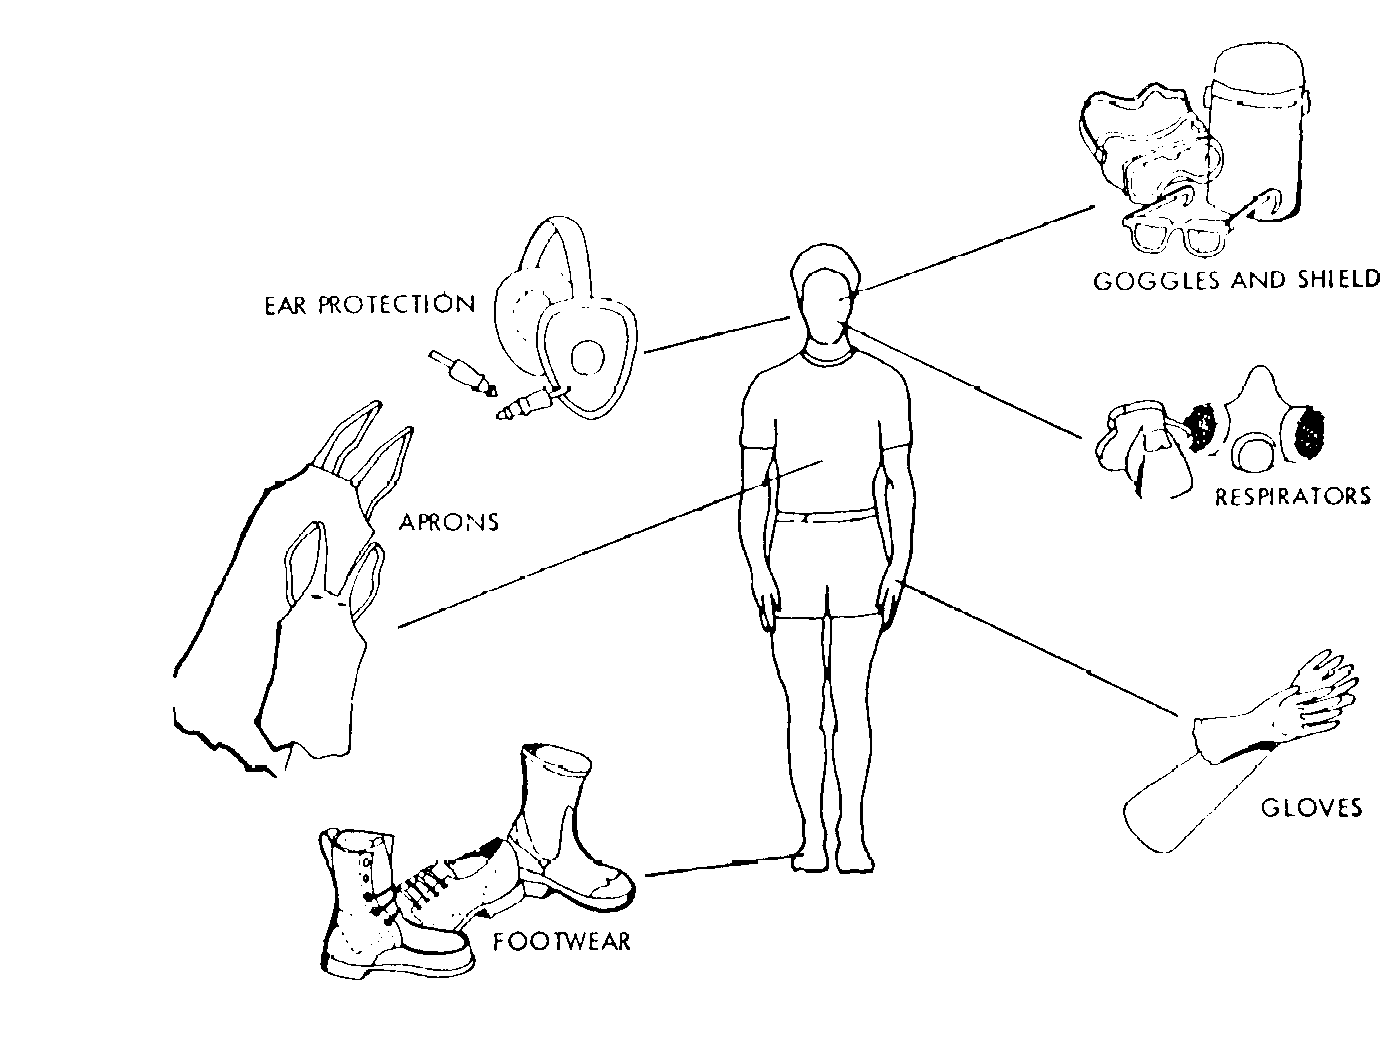
Personal Protective Equipment
PPE

 
Personal protective equipment (PPE)
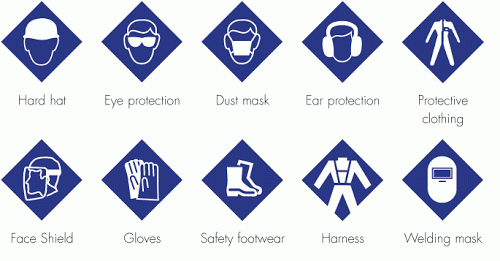
 refers to protective clothing, helmets, goggles, or other garments or equipment designed to protect the wearer's body from injury. The hazards addressed by protective equipment include physical, electrical, heat, chemicals, biohazards, and airborne particulate matter. Protective equipment may be worn for job-related occupational safety and health purposes, as well as for sports and other recreational activities. "Protective clothing" is applied to traditional categories of clothing, and "protective gear" applies to items such as pads, guards, shields, or masks, and others.

The purpose of personal protective equipment is to reduce employee exposure to hazards when engineering and administrative controls are not feasible or effective to reduce these risks to acceptable levels. PPE is needed when there are hazards present. PPE has the serious limitation that it does not eliminate the hazard atsource and may result in employees being exposed to the hazard if the equipment fails.

Any item of PPE imposes a barrier between the wearer/user and the working environment. This can create additional strains on the wearer; impair their ability to carry out their work and create significant levels of discomfort. Any of these can discourage wearers from using PPE correctly, therefore placing them at risk of injury, ill-health or, under extreme circumstances, death. Good ergonomic design can help to minimise these barriers and can therefore help to ensure safe and healthy working conditions through the correct use of PPE.

Practices of occupational safety and health can use hazard controls and interventions to mitigate workplace hazards, which pose a threat to the safety and quality of life of workers. The hierarchy of hazard control hierarchy of control provides a policy framework which ranks the types of hazard controls in terms of absolute risk reduction. At the top of the hierarchy are elimination and substitution, which remove the hazard entirely or replace the hazard with a safer alternative. If elimination or substitution measures cannot apply, engineering controls and administrative controls, which seek to design safer mechanisms and coach safer human behavior, are implemented. Personal protective equipment ranks last on the hierarchy of controls, as the workers are regularly exposed to the hazard, with a barrier of protection. The hierarchy of controls is important in acknowledging that while personal protective equipment has tremedous utility, it is not the desired mechanism of control in terms of worker safety.


Fatal Lifting Accident

OGP Safety Alert

FATAL LIFTING INCIDENT

Country: VIETNAM – Asia/Australasia

Location: OFFSHORE : Mobile Drilling Unit

Incident Date: 3 November 2010

Type of Activity: Lifting, Crane, Rigging, Deck operations

Type of Injury: Struck by

Function: Drilling

A Service Company Supervisor was fatally injured when a lifting operation on an offshore drilling rig snagged and then lost control. Originally intended to be present as an observer, the Injured Person (IP) entered the hazard zone when a roustabout handling a tag line queried the rigging arrangement with him. During this brief distraction, the roustabout released tension on the tag line and one leg of the sling caught on an overhead obstruction (a stairwell platform). When the sling became free the load swung towards the IP and his head was caught between the load and a container.
 Safety Safetyalerts Alert Images 230 S230 Img1
What Went Wrong?:

Human Factors:
- The roustabout did not address the lift supervisor first and the lift was not stopped properly
- The IP entered the hazard zone without permission from the lift supervisor
Inadequate planning and organisation of the work:
- An adequate and effective Job Safety Analysis (JSA), either written or verbal, was not conducted beforehand; the risks, precautions, lift plan, rigging arrangements, roles and responsibilities and communication were not discussed, consequently:
  • The rigging arrangements were not discussed leading to confusion over how the load was rigged and the roustabout’s distraction from the job
  • There was a lack of awareness of the dangers of the lifting environment
  • People did not know the arrangements to stop the job. The IP got drawn into the lift, although his role was to observe from a safe place
Failure to follow known procedures:
- There was casual compliance with the rig’s processes for the control of work which, if followed more robustly, would have led to better planning and control over the operation.
Corrective Actions and Recommendations:
Plan and Organise Work:

  • Only competent and authorised personnel should be directly involved in any work
  • Rigging and lifting arrangements should be discussed and agreed prior to commencing a lift
  • All parties shall participate in the JSA/JRA process, including those with a ‘passive’ role
  • Prompt cards should be used to help personnel conduct high quality JSA conversations
  • Roles and responsibilities for any work shall be clearly defined and agreed, including a clear definition of how communication will be conducted (e.g. directly to the lift supervisor)
  • Clear and unambiguous “stop the job” signals or commands will be agreed
  • No activity should start until all involved confirm they believe it is safe to do so
  • Hazard zones around worksites should be clearly identified and no unauthorized people should be able to enter during activities
  • Plan workload and resources – being undermanned or in a rush encourages shortcuts
Plan well for new contracts:
  • Ensure that minimum competence criteria is clearly defined in the contract and is met before acceptance
  • Ensure that the minimum crew/manning and supervision requirements are considered and met before the contract commences
  • Evaluate key risk areas by assessing the quality and effectiveness of standards, procedures and practices for:
- Safe Control of Work (permit to work, work instructions, JSA/JRA/Risk assessment, etc.)
- Lifting and rigging
- Competence Assurance
- Observational safety programmes
- and any other safety critical activities and risks as defined by your own risk assessment of the activities to be performed
  • In circumstances where it has not been practicable to see these areas in action before acceptance, audit them as soon as the activities start during the contract.
  • Engage subcontractors and third parties early in the planning and risk assessment process, to understand their needs, standards and best practices, and to confirm roles and responsibilities
  • Plan and resource an audit, assurance and supervision programme, and prioritise on the biggest risks
  • Thoroughly check the effectiveness of controls and practices on site and compliance with procedures. Tell management how it really is.


Chain Sling Inspection

Inspection

If any of the identification items are missing or any of the listed damage criteria are met the sling must be destroyed

  1. Identification
    1. The tag identifies size, reach, working load limit (WLL),
    2. serial number, manufacturer's name or symbol, and
    3. sling type (number of legs).


  1. Damage

Clean chain and hang vertically for inspection
    1. Measure reach accurately (bearing point of master ring to bearing point of hook). Check this length against the reach shown on tag. If present length is greater than that shown on tag, there is a possibility that the sling has been subjected to overloading or excessive wear.


    2. Make a link-by-link inspection of the chain slings for:
      1. Excessive wear - If the wear on any portion of any link exceeds the allowable wear of a link (Check with the chain manufacturer for wear specifications), immediately remove from service.
      2. Twisted, bent, gouged, nicked, worn, or elongated links.
      3. Cracks in the weld area of any portion of the link. Transverse markings are the most dangerous.
      4. Severe corrosion.

CracksDamaged Chain Sling
ElongationStretched Chain Sling
DeformationTwisted or Bent Chain Slings

    1. Check Hooks links for :
      1. Deformation . Any bending or twisting exceeding 10 degrees from the plane of the unbent hook, unless otherwise directed by the hook manufacturer.
      2. Throat Opening . Any distortion causing an increase in throat opening exceeding 15 percent or as otherwise directed by the hook manufacturer.
      3. Wear . Any wear exceeding 10 percent of the original section dimension of the hook or its load pin or as otherwise directed by the hook manufacturer.
      4. Cracks . Any visible crack.

    1. Check Master Links links for :
      1. Deformation . Stretching. Measure masterlink opening on long and narrow sides and and compare to manufacturer
      2. Wear . Any wear exceeding 10 percent of the original section dimension of the hook or its load pin or as otherwise directed by the hook manufacturer.
      3. Cracks . Any visible crack.

Wednesday 17 April 2013

Line of Fire Hazard Recognition


Lifting/Hoisting
• Never walk under a suspended load.
• Communicate to other workers when entering a lifting/hoisting zone, even if for a short period.
• Balance the load prior to lifting.
• Rigging equipment shall never be loaded in excess of its maximum safe loading limit.

Line of Fire Hazard Recognition
When it comes to preventing injuries at the workplace, it is often good to start with the basic types of injuries that do occur. These can be broken down into three categories.
As you consider the possibility of workplace injures, consider the following as the main ways workers can be hurt:
  1. Caught-in
  2. Struck by
  3. Energy Released
Once you understand the above, the next step is to determine which types of activities or settings cause the majority of workplace injuries.
Line of Fire refers to those workers who put themselves in harm's way by virtue of the type of work they do. This can occur in both manufacturing and construction. Line of Fire injuries can occur in the following areas.
Target Areas:
  • Heavy Equipment
  • Machinery
  • Hand and Power Tools
  • Material handling
  • Mobile Equipment
  • Excavations
  • Unsafe Behaviors
It is important to always remember that Line of Fire hazards are one of the most deadly hazards found in Manufacturing and Construction, second only to Slip, Trips and Fall.
Each year hundreds of workers are injured by Line of Fire accidents.
Deaths from Line of Fire injuries number into the hundreds. Approximately 27% of work place deaths are related to Line of Fire accidents.
As companies consider their safety programs, the objective should be:
No one gets hurt because of a Line of Fire injury whether they are performing the task or simply in the area.
Caught-in hazards occur when a worker could be caught inside of or in between different objects.
Struck by hazards occur when a worker could be struck by an object.
Energy Released hazards occur when a worker is in the path of Released Hazardous Energy.

Crane Signals

When should the crane operator follow hand signals?

A crane operator should always move loads according to the established code of signals, and use a signaler. Hand signals are preferred and commonly used.


Who can give the hand signals? or Who can be a signaler?

  • A person qualified to give crane signals to the operator.
  • There should be only one designated signaler at a time.
  • If signalers are changing between each other, the one in charge should wear a clearly visible badge of authority.
  • A crane operator should move loads only on signals from one signaler.
  • A crane operator must obey STOP signals no matter who gives it.


What should you do when in charge of signaling?

The signaler must:
  • Be in clear view of the crane operator.
  • Have a clear view of the load and the equipment.
  • Keep persons outside the crane's operating area.
  • Never direct a load over a person.


What are examples of some common hand signals?

Hoist: With forearm vertical, forefinger pointing up, move the hand in a small horizontal circle. Lower: With an arm extended downward, forefinger pointing down, move the hand in small horizontal circles.
Multiple Trolleys: Hold up one finger for block marked "1" and two fingers for a block marked "2." Regular signals follow.
Hoist
Hoist
Lower
Lower
Multiple Trolleys
Multiple Trolleys
Bridge Travel: Arm extended forward, hand open and slightly raised, make a pushing motion in direction of travel.
Trolley Travel: Palm up, fingers closed, thumb pointing in direction of motion, jerk the hand horizontally.
Stop: Arm extended, palm down, hold the position rigidly.
Bridge Travel

Bridge Travel
Trolley Travel
Trolley Travel
Stop
Stop
Emergency Stop: Arm extended, palm down, move the hand rapidly right and left.
Magnet Is Disconnected! : Crane operator spreads both hands apart, palms up.
Dog Everything: Clasp hands in front of the body. Means PAUSE. This signal can be used on potentially risky occasions such as when it has started raining, when the load doesn't fit the space for which it was planned, or when a bystander gets too close to the action.
Emergency Stop
Emergency Stop
Magnet is Disconnected!
Dog Everything
Dog Everything


What are some common hand signals for crawler, truck and locomotive cranes?

Use Main Hoist: Tap fists on head; then use regular signals. Use Whip Line (Auxiliary Hoist): Tap elbows with one hand; then use regular signals.
Raise Boom: Arm extended, fingers closed, thumb pointing upward.
Lower Boom: Arm extended, fingers closed, thumb pointing downward.
Swing: Point with a finger in direction of swing of a boom.
Use Main Hoist
Use Main Hoist
Use Whip Line
Use Whip Line
Raise Boom;  Lower Boom; Swing
Raise Boom; Lower Boom; Swing
Raise the Boom and Lower the Load: Arm extended, fingers closed, thumb pointing upward, other arm bent slightly with forefinger pointing down and rotate hand in horizontal circles.
Lower the Boom and Raise the Load: Arm extended, fingers closed, thumb pointing downward, other arm with forearm vertical, forefinger pointing upward and rotate the hand in horizontal circles.
Move Slowly: Use one hand to give any motion signal and place the other hand motionless in front of the hand giving the motion signal. (Hoist Slowly shown as example.)
Raise the Boom and Lower the Load
Lower the Boom and Raise the Load
Move Slowly
Move Slowly
Retract Boom (Telescoping Booms): Both fists in front of body with thumbs pointing toward each other.
Extend Boom (Telescoping Booms): Both fists in front of body with thumbs pointing outward.
Retract Boom
Retract Boom
Extend Boom
Extend Boom


What are some signals for crawler cranes only?

Lock Track: this side as indicated by raised fist. Turn Travel Track: this side in direction shown by revolving fist.
Travel Both Tracks: forward or backward by revolving fists.
Lock Track - Turn Travel Track
Lock Track
Turn Travel Track
Travel Both Tracks
Travel Both Tracks

What are the types of shackles that you can choose?

What are the types of shackles that you can choose?

Anchor (bow type) and chain ("D" type) shackles are used with screw or round pins.
  • When selecting the right shackle, refer to manufacturers' tables for the safe working loads of the shackles.
  • Shackles are sized according to the diameter of the bow section rather than the pin size. Never use a shackle if the distance between the eyes is greater than listed in the manufacturers' tables.

How should you inspect shackles?

  • Inspect shackles regularly.
  • Inspect the shackle eye and pin holes for stretching (elongation) and wear. Elongation means the metal is being overloaded.
  • Inspect the shackle body for bending. A bent shackle indicates excessive side-loading.
  • Inspect all shackle pins for distortion, surface blemishes, wear and fractures.
  • All pins must be straight and all screw pins must be completely seated. Cotter pins must be used with all round pin shackles.
  • Replace shackles that are bent, show excessive wear by more than 10% of the original diameter, or have an elongated eye or shackle pin holes.

What should you avoid when using shackles?

  • Do not replace the shackle pin with a bolt or unidentified pins. A load will bend the bolt.
Do not replace the shackle pin with a bolt
  • Do not allow a shackle to be pulled at an angle. The legs will open. Pack the pin with washers to center the shackle.
Pack the pin with washers to centre the shackle
  • Do not use screw pin shackles or fit pins in contact with moving parts if the pin can roll and unscrew. If the load shifts, the sling will unscrew the shackle pin.
Do not use screw pin shackles if the pin can roll and unscrew
  • Do not use shackles with bent pins or deformed bodies.
  • Do not force, hammer or wedge shackles into position.

PROCEDURES FOR DETERMINING COMBINED CENTER OF GRAVITY OF LOAD ON CAR ABOVE TOP OF RAIL OF LOADED OPEN TOP CARS


The following information is necessary to determine the combined center of gravity of a loaded open top car. A = Height of car deck from top of rail. B = Center of gravity of car above top of rail, obtainable from car owner. C = Center of gravity of load from base of load, obtainable from shipper. D = Combined height of center of gravity of load, (C), plus height of car deck, (A), that is (C) + (A). E = Lightweight of car, in pounds, as stenciled on car. F = Weight of load, obtainable from shipper.
The calculation to arrive at the center of gravity is as follows: (B x E) + (D x F)  = Combined center of gravity above top of rail. E+F
Example: A = 44 inches B = 27 inches C = 60 inches D = (60 + 44) = 104 inches E = 55,000 Lbs. F = 120,000 Lbs.
Formula: (B x E) + (D x F)  + C. G. ATR E+F
(27 x 55,000) + (104 x 120,000) 55,000 + 120,000
1,485,000 + 12,480.000 = 13,965,000 = 79.8 inches ATR 175,000 175,000
Notes: 1. The above is an example of a basic calculation for determining the combined center of gravity of load and car. 2. Where the load consists of multiple piles or pieces with differing centers of gravity, the entire C.O.  of the entire load must be calculated before it is combined with the car weight and C.O. 3. Acceptable centers of gravity for interchange purposes are governed by Rule 89.  Section B.  1, e of the Field Manual of the AAR Interchange Rules.  

Monday 15 April 2013

Inspection, 
of Synthetic Web Slings

Removal From Service
A sling shall be removed from service if any of the following are visible:
1. If sling rated capacity tag is missing or not readable.
2. Acid or alkalis burns.
3. Melting, charring or weld spatter of any part of the sling.
4. Holes, tears, cuts, snags or embedded particles.
5. Broken or worn stitching in load bearing splices.
6. Excessive abrasive wear.
7. Knots in any part of the sling.
8. Distortion, excessive pitting, corrosion or broken fittings.
9. Any conditions which cause doubt as to the strength of the sling.


Before/ After using wire rope it must be inspected by rigging personnel each time.

I will show you what is the wire rope and how to inspect it.
Rope replacement criteria based on the number of broken wires.
Replace rope if there are -:

- 6 or more broken wires in one lay
- 3 or more broken wires in one strand
- 2 or more broken wires in lay in standing ropes
Follow fig A, B , C and D

Wire Rope structure 


 How to Measure wire rope
 Type of wire rope
 How to inspect wire rope

Rigging and Lifting solution

Hi,
This is Admin Riyaz,,,
I am here for solve your lifting and rigging problem. First of all let me properly introduce my self I am from Bhopal, India. I worked in many countries and companies as single rigging and lifting responsible person.
I have knowledge and experienced of various type of works & projects such as-:
- Heavy equipment installation by jacking & skidding
- Heavy equipment installation by crane
- Heavy pipe erection
- Rig moves
- Heavy machine alignment 
- Heavy equipment replacing in live plant without disturbing of structures and pipes
- Heavy Moto replacement by jacking and skidding
- Transformer complete installation by jacking and skidding
- Tower crane erection
- Crawler crane erection with super and luffing jib
- Engineered lift plan
- Lift Study
- Job Safety Analysis
- Method of statement
- Heavy transportation
- Transportation plan & study
- Inspection of lifting machine and gears
- Design and Fabrication of lifting equipments
- Hydraulic system
I will solve your rigging and lifting problem. I will be happy to help you.


image.png
(MOHAMMAD RIYAZ KHAN)
Rigging & Lifting Specialist  
Lifting and rigging solution,,,
i will be glad to help you,,,,,,,,,,,,,,,,,,